
Manual for MeetingPlus
For an optimal experience kindly access the virtual platform through the CHROME browser, this means that no external software download is required besides accessing the website.
The basic requirements are as follows:
• Personal computer/laptop
• Presentation hand over check that all is ok- it is highly important to advise that we do not have animations set at PPT! We convert those to our platform in order to have a smooth transaction. Videos are played separately and need to be loaded to the platform as individual files or YouTube / Vimeo links. • 10MB Internet connection (with optimal transmission quality)
• CHROME browser
• Computer Camera - (The camera is built into each laptop). If you have an HD camera connected with a USB that will be even better.
• Microphone (built-in)
• Headphones – to avoid any background sound that can be. · Please make sure that any other application that is using your computer camera (Zoom, Webex, etc. ) is closed. Kindly check your camera/audio connection by using the below tester link: https://embed.archiebot.com/connection-tester
Virtual Meeting Space
Before the event, access the meeting room. This URL is specifically created for you; it ensures that you join the meeting as a HOST. No passwords or tokens are required.
Host Link: Multiple people from your company can use the HOST link to join. This will give them access to all presentation tools within your virtual meeting space.
Attendee Link: You can invite customers/prospects to join your virtual meeting space using this link. If you would like to test the interaction between host and attendee, please do not open the two links in the same browser. Please open the Host link in an incognito browser.
1. This will be the screen when you join. Moving forward the manual will address this page often, so please examine carefully. 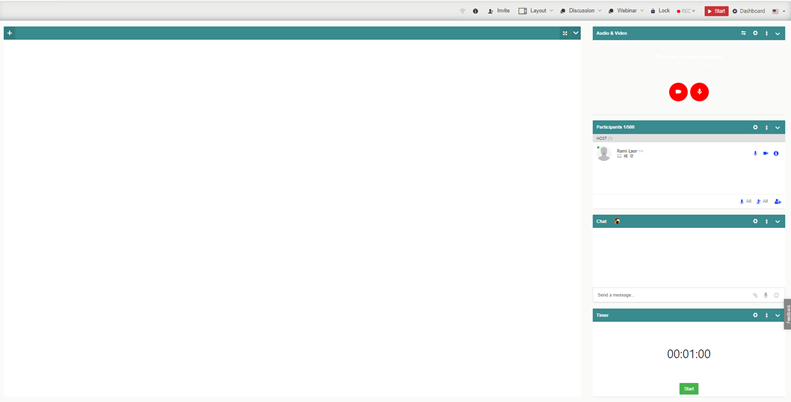
2. There are 6 main areas in the main page; A. Control area B. Sharing area C. Audio & Video area D. Participants area E. Chat area F. Timer
3. The Control Area  This is where all your controls live, from left to right;
This is where all your controls live, from left to right; · Connection Quality; when you hover over the WiFi icon you can see the connection quality between your computer to our servers. The better it is the better experience you will have during the event. We advise that you connect to the Internet with an ethernet cable during the event, if this is not possible and you have to connect wirelessly, we advise that you stay within 10 metres of your wireless router.
· Information; when you press this icon you will see the information of the booth.
· Invite; this will allow you to invite attendees. Generally attendees will be registered and invited before the event so you would not need to use this option.
· Layout; There are 6 layout options, a layout will be chosen for you before the event.
· Mode selection; a mode will be chosen for you before the event. You don’t need to change it
o Discussion: This will allow all participants to talk. For larger session, up to 25 participants can talk at the same time and others will listen.
o Presentation; only presenters are allowed to talk. Participant listen.
o Q&A: Only Presenters can talk, participant can ask for permission to speak.
· Interface templates; there are two interface templates. One will be chosen for you before the event. You Don’t need to change it.
o Webinar Interface Template: Interface most suitable for webinars and presentations in large groups with all features.
o Meeting Interface Template: An alternative, clean interface layout. Best for meetings in small to medium groups.
· Lock/Unlock: This option allows you to enable or disable access to the meeting room. If the room is locked, you will receive a “knock” from the participants to enter the room. You will have to let them in to the room, if it is unlocked the participants can enter freely. This option will be chosen before the event.
· Recording: The meeting you are having can be recorded abd later shared with every participant.
· Start / Stop: This button starts or stops the meeting. When you click stop you will be asked if you would like to exit yourself, stop the session or stop and log-out participants. This will be controlled by the Host, so please only click “Exit Myself” if you want to leave the meeting.
4. Sharing area 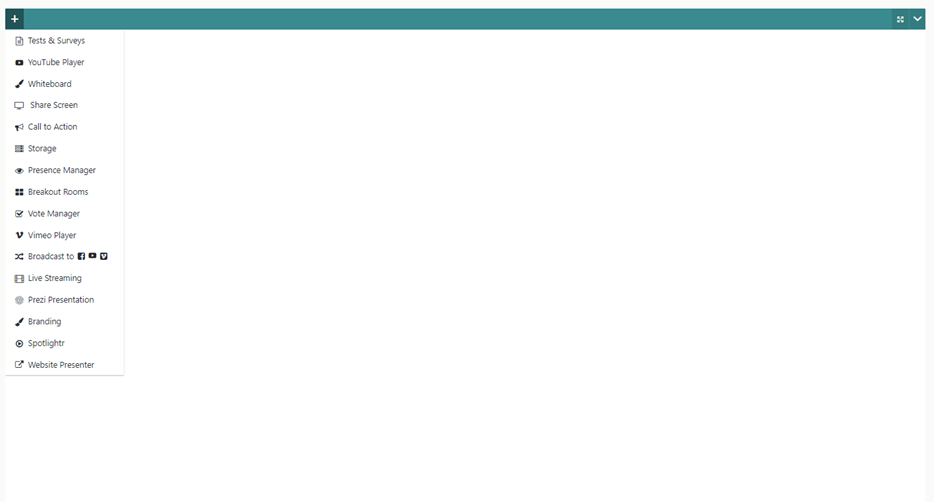 This is where you see what you are sharing with the participants. To upload presentaion or welcome slide please click on the Plus Icon on the left top bar and choose “Storage” To present the slide click on “present” on the iteam you wants to share
This is where you see what you are sharing with the participants. To upload presentaion or welcome slide please click on the Plus Icon on the left top bar and choose “Storage” To present the slide click on “present” on the iteam you wants to share
5. Audio & Video 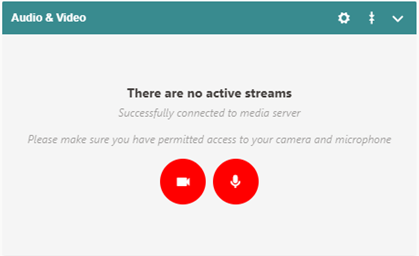
When you are ready to stream video and audio please click on the camera button, this will grant access to your camera and microphone allowing participant to see and hear you. When you click the camera icon you will be asked to grant permission by your browser, please accept. If the system detects any issues with your microphone you will receive a warning;
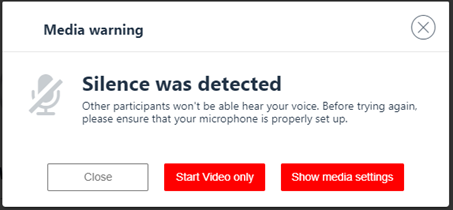
Please click “Show media settings” and make sure you have the right camera and microphone selected. Also speak to check if the selected microphone is working properly. If it is, you will see the light gray bars under your microphone will turn dark gray.

If everything is in order please click apply changes.
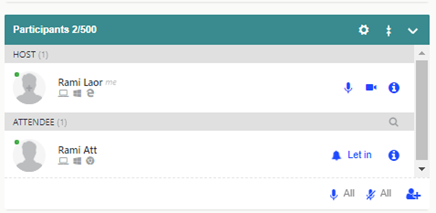
6. Participants area In this area you will see every host, presenter, moderator and attendee. As a host you have control over ther audio & video, meaning you can enable or disable their microphone and camera. Audio & video default settings will be determined by the mode selection previously discussed. To allow an attendee to speak or share their camera please click on the icon next to their name accordingly. When a new attendee would like to get to your room you will hear a nok on the door and you can see the message of “Let in” next to his name, click on Let in to give him the acsses to the room. Now when the attendee is in the room he can hear and see everything that happens in the room. he can open his camara and you also have the option to ask to open it by clicking on the camara icon next to his name
You can move the Audio and Video area to the main scren by clicking on the two arrows on the auido.

7. Chat area This is where all participants can chat. The moderator will see a full screen chat screen where she/he can read all the messages written in the chat box where she/he can reject or accept questions The rejected messages will not be seen by the presenter, the accepted ones will be show in the chat area.
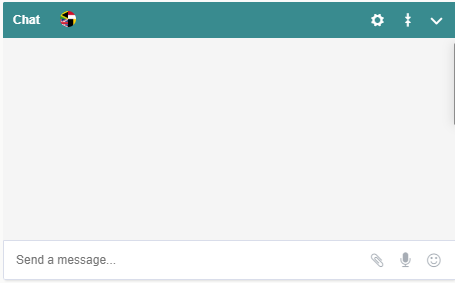
** From the setting icon on etch part you can choose if to show this area to the clintes or not: 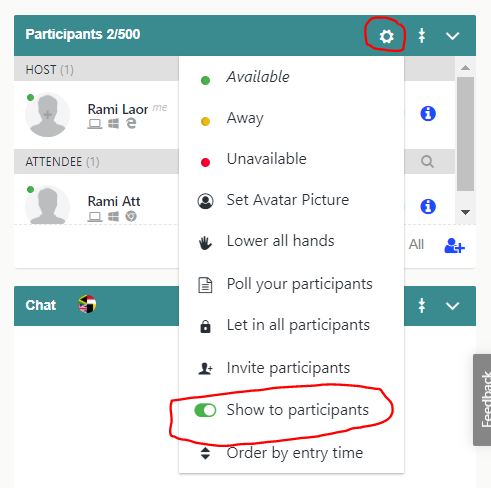
8. Timer. This is not relevnt to you just click on the arrow on the side to hide it. This is not beeing show to the attendee at any point.